The Internet
TESL Journal
sendaiben{at}gmail.com
http://www.c-english.com/
Miyagi Prefectural Board of Education (Sendai, Japan)
Name Signs: An Easy Way to Learn Student Names
Ben Shearonsendaiben{at}gmail.com
http://www.c-english.com/
Miyagi Prefectural Board of Education (Sendai, Japan)
Learning student names can be a challenge for many teachers. Especially for those with large classes, using student names freely in class can seem an impossible goal, particularly if they only see the classes once a week. This year I started teaching a new class with 55 students, and in the lead-up to the start of term spent a lot of time thinking about how to deal with the student name issue. I eventually decided to try an old-fashioned method, but it has proved so effective that I would like to share the results with other teachers here.
For years I struggled with seating charts, photo books, class lists, and other props that did not seem to help me to learn names, or more importantly, help me to call on students by name in class. Now I am five weeks into using name signs, and right from the very first class I have been able to call on specific students to answer questions, deal with queries, and put names to faces instantly. I have also used the signs to set up the classroom and assign students to specific groups.
I was initially apprehensive about using the signs, and worried that students would resent the use of the signs or consider them childish or patronizing. However, the cost of not using the signs would be to possibly go through the entire year without being able to call students by their names.
So far the system has worked well. I believe an initial explanation is important (see step 1 below) and helps win students over to the idea. As well as allowing teachers to call on students to answer questions easily, the name signs really accelerate learning student names and also allow teachers to check attendance easily.
Teachers with large, lecture-style classes may have no need for name signs, especially if they don’t need to call on students to answer or for classroom management purposes. Similarly, teachers with smaller classes can probably learn names easily without taking additional measures. However, for large conversation or communicative English classes, name signs provide very tangible benefits compared to their fairly negligible drawbacks.
Preparation
Make sure you have enough paper so that each student can receive one piece. I have found that A4 paper works well and strikes a good balance between being large enough to be easily visible from the front of the class yet small enough to not get in the way and clutter desks up. Also procure enough magic markers for students to have easy access to them (if students have too few markers this project takes much longer, and will result in some students writing their name signs using regular pens, making them much harder to read).Procedure
Step 1
Explain to students that you would like to both learn their names and use them in class. Apologize for your poor memory and explain that name signs will help with both of these objectives. I find this explanation and apology helps avert any resentment the students may have over the name sign system. Show students a sign you have made for yourself, and place it on the lectern or desk at the front of the room.Step 2
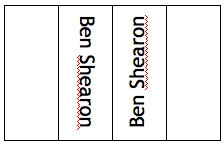
Explain how to make the signs: first, fold the piece of paper in half, then fold each half in half again. Your piece of paper will now be folded three times, dividing it into four equal sections. All the folds should face in the same direction. On the outside of the paper write your name as large as you can on both of the middle sections so that it faces outwards (see figure 1). Having done this, fold the paper so that it forms a triangular column, with the names visible front and back (see figure 2). Make sure that students use colours that are easy to see from a distance: yellow and pink are not recommended for this.Finally, have students place the finished name signs on their desks so that it can be easily seen from the front of the room.
Figure 1
Step 3
Use the signs to call on students by name, and also to quiz yourself on students’ names during lulls in the class. This constant practice will allow you to learn names quickly and efficiently.Figure 2

*the bottom two sides overlap each other
Notes
I find it best to keep the name signs between classes. As long as they are not glued or stapled together, they fold flat for easy storage and transportation. Laying the signs out at the front of the room before class allows students to pick them up as they come in (1).At the end of the class, students give the name signs back to the teacher, avoiding problems such as students losing or forgetting to bring their signs. Another result of this is that teachers can easily check attendance by seeing which signs haven’t been taken (2).
Signs can also be used to assign students to specific groups or seats: if the teacher has some time before class, they can place the name signs around the classroom and ask students to sit by their sign. This is a very painless way of imposing a seating plan on a class.
(1) an alternative is to ask the students to keep the signs in their textbooks, secured with a paper clip to the inside of the cover.
(2) it is probably wise to somehow check that canny students aren’t gaming the system by having their friends take their signs!
The Internet TESL Journal, Vol. XII, No. 11, November 2006
http://iteslj.org/
http://iteslj.org/Techniques/Shearon-NameSigns/